Docker installation in RHEL7/ Cent OS 7

We are going to see Docker installation in RHEL7/ Cent OS 7.

Docker packages are available for RedHat Servers and RHEL Atomic Host editions alone not for other workstations or other variants of RHEL.

In this installation method internet is mandatory.

Docker installation using native docker script is straight forward method. Using “curl”  will install the docker.  Before installing docker, first check curl  package is installed on your system.

#curl –version

[root@localhost ~]# curl --version
curl 7.29.0 (x86_64-redhat-linux-gnu) libcurl/7.29.0 NSS/3.21 Basic ECC zlib/1.2.7 libidn/1.28 libssh2/1.4.3
Protocols: dict file ftp ftps gopher http https imap imaps ldap ldaps pop3 pop3s rtsp scp sftp smtp smtps telnet tftp
Features: AsynchDNS GSS-Negotiate IDN IPv6 Largefile NTLM NTLM_WB SSL libz unix-sockets
 Installing Docker using curl command
 
  Use the below command to install the docker.
 
#curl -SSL https://get.docker.com/ | sh
 
Now will enable the docker permanently in this runlevel and will start docker.
Command to enable the docker in this runlevel
#systemctl enable docker


Command to start the docker
#systemctl start docker
 
 
command to check the docker status
#systemctl status docker
 
 
Command to restart the docker
#systemctl restart docker


Docker has been installed and now will check the docker installation here.
#docker run hello-world


Will list the new containers with below command

#docker ps -a


Bash Shell Script – 1

Bash Shell Script - 1

Bash shell scripting is collections of Linux commands in a single file and we should know where and when to use the command. Its mandatory to know all the basic commands for bash shell scripting.

Execute permission is must to run the script.

Using below command will add the execute permission to a file.

#chmod +x testscript.sh

Here am using testscript.sh file for simple script.

Now check using “ll” command whether the permission has been added or not.

#ll | grep -i testscript.sh

We can use three methods to execute the bash shell script.

1. ./testscript.sh
2. sh testscript.sh
3. bash testscript.sh

Here am writing script to display a string.
Echo command will do simple printing whatever we are giving with double quotes.

Already i have created testscript file using vi editor.

#vi testscript.sh

Now will write a script to display Current logged in user, date and Count of users logged in.
Use the vi editor to create script file.

#vi testscript1.sh


type the below set off commands to create this script.

Save and exit from the file.

change the permission using chmod command.

#chmod +x testscript1.sh

Now run the script and check for the output.


like above will create bash shell scripts for our requirements.
Will see some other examples in next post.


DNS Configuration on RHEL7/ Cent OS 7

                 Domain Naming System is a naming convention for computers, which is connected to the internet. Its not possible to remember all the web server IP Address. So, here its comes as a resolution for this. Because, It will translate from the IP Address to Name and Name to IP Address.

We are going to see how to setup DNS in RHEL 7 and Cent OS 7.

Requirement:

Host Name: server.linuxbookcenter.com
IP Address: 192.168.43.226

Packages:
1. bind
2. bind-utils

Installing bind packages:

[root@server]# yum -y install bind*

BIND Configuring:

We are going to configure the “/etc/named.conf” file for BIND configuration.
open the file using vi editor and comment out two lines like shown below. This lines allow your DNS to listen all the IP Address.

Add your network by modifying “allow-query” line in the named.conf file to all the computers to do name transition which connected in this network

#vi /etc/named.conf

[root@server ~]# vi /etc/named.conf 

options {
 #listen-on port 53 { 127.0.0.1; };
 #listen-on-v6 port 53 { ::1; };

 directory "/var/named";
 dump-file "/var/named/data/cache_dump.db";
 statistics-file "/var/named/data/named_stats.txt";
 memstatistics-file "/var/named/data/named_mem_stats.txt";

 allow-query { localhost; 192.168.43.226/24;}; 

And the zone file information will be available in “/etc/named/rfc1912.zones” file by default. Here we should modify the entry based on our requirement.

Note: This entry contains the forward and reverse zone file names.

This file location included in “/etc/named.conf” file. Find the below screenshot.

Now save and exit from the “/etc/named.conf” file.

Provide zone file information entry:

edit the “/etc/named.rfc1912.zones”  file to provide the zone file information entries.

[root@server ~]# vi /etc/named.rfc1912.zones

And make the below entries or modify the existing one based on our requirement.


zone "localhost.localdomain" IN {
 type master;
 file "named.localhost";
 allow-update { none; };
};

zone "lbcdomain.com" IN {
 type master;
 file "fwd.lbcdomain.com.db";
 allow-update { none; };
};

zone "1.0.0.0.0.0.0.0.0.0.0.0.0.0.0.0.0.0.0.0.0.0.0.0.0.0.0.0.0.0.0.0.ip6.arpa" IN {
 type master;
 file "named.loopback";
 allow-update { none; };
};

zone "1.0.0.127.in-addr.arpa" IN {
 type master;
 file "named.loopback";
 allow-update { none; };
};

zone "226.43.168.192.in-addr.arpa" IN {
 type master;
 file "43.168.192.db";
 allow-update { none; };
};

Create and Configure the Zone files:

Default location for the zone file’s :  /var/named

create a forward zone file with “fwd.lbcdomain.com.db”   name.

[root@server named]# vi /var/named/fwd.lbcdomain.com.db
 Provide the below entries to complete the forward zone configuration.
keywords for Zone Files
A – A record
NS – Name Server
MX – Mail for Exchange
CN – Canonical Name

$TTL 86400
@ IN SOA server.lbcdomain.com. root.lbcdomain.com. (
                            20171129 ; serial
                            3600     ; refresh
                            1800 ; retry
                            604800 ; expire
                            86400 ) ; minimum
;Name server info
@ IN NS server.lbcdomain.com.

;Name server Ip info
server IN A 192.168.43.226

;Mail exchanger
lbcdomain.com. IN MX 10 mail.lbcdomain.com.

;A - Record Hostname to IP Address
www IN A 192.168.43.10
mail IN A 192.168.43.15

;CNAME Record
ftp IN CNAME www.lbcdomain.com.

Save and exit from the file and create reverse zone file with the name of “43.168.192.db”

PTR – Pointer

SOA – Start of Authority

[root@server ~]# vi /var/named/43.168.192.db
make the below entries in reverse zone file like below.
$TTL 86400
@ IN SOA server.lbcdomain.com. root.lbcdomain.com. (
                        20171129 ; serial
                        3600 ; refresh
                        1800 ; retry
                        604800 ; expire
                        86400 ) ; minimum

;Name server info
@ IN NS server.lbcdomain.com.

;Reverse lookup info
226 IN PTR server.lbcdomain.com.

;PTR Record for IP to Hostname
10 IN PTR www.lbcdomain.com.
15 IN PTR mail.lbcdomain.com.

Save and exit from the file.

We completed all the configuration and we should restart the bind service.

[root@server ~]# systemctl restart named

Make it enabled in system startup.

[root@server ~]# systemctl enable named
Now login in any client system which is already connected in same network and make DNS entries in
/etc/resolv.conf  file like below.
#vi /etc/resov.conf
Save and exit from the file and if  NM is managing the network, make DNS entry in /etc/sysconfig/network-scripts/ifcfg-eth0
 
 
Note: In my infra i took this network adapter configuration file for this ifcfg-eth0. This might vary in your systems.
 
#vi /etc/sysconfig/network-scripts/ifcfg-eth0


Save and exit after making the entry and restart the network service.
#service network restart
 
Will check the DNS connection from the client to DNS servers using dig command. Use the below command to check forward lookup
#dig www.lbcomain.com
Will receive the below output if working good.
Check in reverse from IP to Hostname to confirm whether the reverse lookup is working fine not.
#dig -x 192.168.43.226

Output:

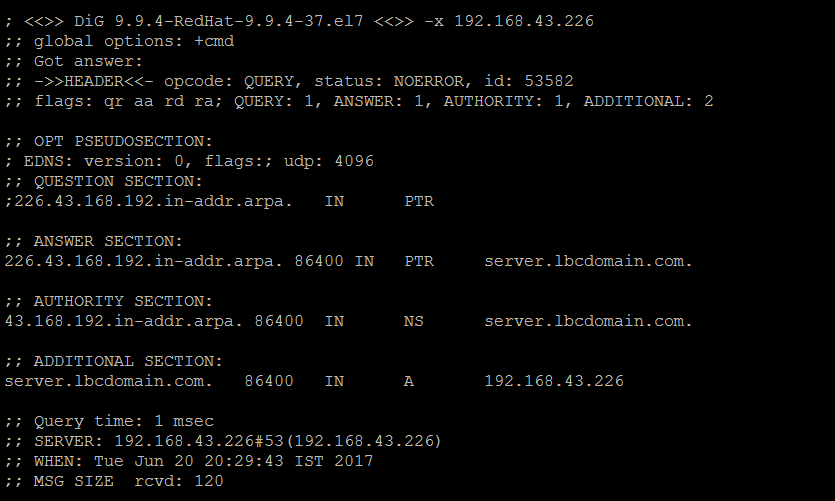
We completely done on DNS configuration now:)

Changing/ Recovering root user password in RHEL7/ Cent OS 7

We are going to see How to Changing/ Recovering root user password in RHEL7/ CentOS 7 in this post

Boot the system and wait for GRUB menu. On some Operating systems, you need to disturb the booting by pressing any keys in your system.

Changing/ Recovering root user password in RHEL7/ Cent OS 7
Highlight the first line which is pointing the Operating System entry like showed in the above image and press “e” key in your keyboard to edit manually.
Then will get the below screen.
Using up/down, left/right arrow keys move the cursor to the “rhgb quiet” which is in kernel line starting with “linux16”
Using delete/backspace keys manually delete “rhgb quiet” entry and append “init=/bin/bash” entry like below.

Than press Ctrl+x  to reboot your OS with specified option. Once rebooted, will get a shell prompt without credentials.

check whether the root filesystem has been mounted or not.

Mount the root filesystem with RW permission.

Now issue the “passwd” command to recover/change the root password. It will ask for the new password and re-enter the password for confirmation. Once provided the new password will receive the “Authentication token successfully updated”

Relabel the SELinux content using below command.
Restart the machine using the below command.
Finally, we recovered the root password. Now will restart the machine and login with a new root password.

Changing hostname in RHEL7 / CentoS 7

Hostname is like labeling for Computers/ Other devices which is connected in internet/network.
hostname is used to identify/access the computers/devices easily in network.

Will see how to check and change the hostname in RHEL 7/ Cent OS 7

Using “hostname” command will check the existing hostname.

nmtui:

Will use this Network managet tool to set the hostname and it will edit the “/etc/hostname” in background.

Now the hostname has been changed  from “localhost.localdomain” to “server.localdomain” and by  issueing “hostname” command will check whether the change has been implemented or not. If the hostname still shows the “localhost.localdomain” old one, we should restart the hostnamed to force the change in hostnamectl.
Will check the hostname now.
Successfully hostname has been changed.

Failed to start docker.service: Unit not found / Installation of docker in RHEL7.x / CentOS 7.x

Failed to start docker.service: Unit not found / Installation of  docker in RHEL7.x / CentOS 7.x

Will see how to fix Failed to start docker.service: Unit not found / Installation of docker in RHEL7.x / CentOS 7.x.

Docker is open source and it will help us to deploy applications over the Linux containers.
Docker CLI command line tool will help to manage the lifecycle management of  image based containers.

Linux container will enable fast application deployment, simplest testing, troubleshooting and maintenance.

Check for the installed docker details and remove the docker which is already installed.

Again install docker using below command:

#curl -fsSL https://get.docker.com/ | sh


Enable the docker service permanently in this runlevel

Start the docker service

Now docker has been installed started successfully.

To check docker installed correctly or not issue the below command

Configuring LVM in redhat

For LVM Configuration need to follw the below steps.

1. Partition creation
2. Physical volume creation
3. Volume group creation
4. Logical volume creation

Here i’m using /dev/sda and /dev/sdb hard disks

Size:

/dev/sda – 500GB
/dev/sdb – 500GB

I already shared the steps to create partitions in previous post.

Click here to create new partition/filesystem in a physical disk.

Using fdisk we have to change the partition type by changing the ID.

For that we should use “t” option to change the partition type. Once we executed this, it will ask for
the Hex code of partition type. Here we need to mention “8e” as Hex code for LVM partition type.

Note: change the partition type for all HDD/ Partitions which we are going to configure LVM.

Than follow the below steps for LVM configuration.

Next we have to create physical volumes using below mentioned commands.

#pvcreate /dev/sda1 /dev/sdb1


#vgcreate -s 16M newvg /dev/sda1 /dev/sdb1

“newvg” is new volume group name and /dev/sda1, /dev/sdb1 will be added in this volume group.
Now this two hard disks will act as a single hard disk and the new size of hard disk is 1000GB.

Next we have to create logical volumes over the volume group, which is like a partitioning here.

#lvcreate -n lv1 -L 200G newvg

-n:  This option is to mention the new logical volume group.
lv1: new logical volume group name.
-L:  this option is to mention the size of new logical volume.

Now we have created logical volume and we should format and mount the lv.

#mkfs.xfs /dev/newvg/lv1

directory is required to mount the lv.

#mkdir /data

#mount /dev/newvg/lv1 /data


Now we successfully configured LVM. Follow the lvcreate steps to create more lv’s.


Linux kernel update


We are going to see Linux kernel update in this post.
Note: Here kernel is already upgraded one. So, we can’t show different here

Using “uname -r” command will check the current kernel version.

[root@localhost ~]# uname -r
3.10.0-514.el7.x86_64


To update the kernel use the below command.
[root@localhost ~]# yum install kernel*


Again use the uname -r command to check whether the kernel has been updated or not.
[root@localhost ~]# uname -r
3.10.0-514.el7.x86_64

Will undo the upgrade or installation using yum. For that have to check the current activity of yum using “yum history list”

We can use the ID to undo the upgrade/ installed packages.

Now am going to use ID 8 do undo the kernel upgrade

#yum history undo 8

Linux kernel update


Now use the "yum history list" command to check

Again will check whether the kernel upgrade has been removed or not.

Will use same yum option to upgrade/ undo any packages in Linux.

RHEL7 – New features

RHEL7 - New features
We are going to see RHEL7 New features in this post.
Docker    – Popular application-virtualization technology
Systemd  – Systemd was developed to replace the init system. more efficient loading of                       services during the boot process.
XFS         – it’ll support file systems of up to 500TB in size
Microsoft compatible identity management  – it’ll support file systems of up to 500TB in size
Performance co pilot – Performance tuning

Ubuntu operating system 17.04 installation

We can see How to do Ubuntu operating system 17.04 installation in this post.
Step 1 :
Boot the machine using OS media and click on “Install Ubuntu”.

Ubuntu operating system 17.04 installation

Step 2:  Now select the language and click on continue to proceed further.

Step 3:  We could see there are two check box which is mentioning here to enable the “Downloading                 updates while installation and Third party software installation” by checking this two box.

Step 4:  Now in next screen will ask for installation type. On this screen select as per your requirement. I’m going to select “Something else” option and click continue.


Step 5: Select the free space and click on “+”

Step 6:  Provide the required information to create root(/) file system and click ok.

Step 7:  Follow above step to create filesystem whatever you want and here i am create one more directory called “swap”  which doesn’t have filesystem type and it is called as virtual memory as well.

Step 8: Now you could see the created filesystem lists like below.

Step 9:  Click on “Install now” to continue with installation and click continue to confirm the changes.

Step 10: Select the time zone from next screen.

Step 11:  Than select Keyboard layout language.

Step 12:  Provide the username details which we need to create new user and which will help us to manage the system(This is not a default administrator – root) and click continue.

Step 13:  Finally files will be copied from the media to our hard disk and will ask for reboot as a final step.

Now the Ubuntu 17.04 has been installed successfully and ready to use.

Thanks for supporting.

Reference: Ubuntu Docs