How to Install Ansible on RHEL 9?

Ansible is a free and open-source automation tool and it is available in default package repository/App Stream and no need any special repository to be enabled.

Step 1: Install ansible using dnf command

#dnf install -y ansible-core

Once installed, very its version by running below command and we can say this as verifiting whether the ansible or not in our server.

#ansible –version

We can check this by executing something over remote servers using this ansible server. For that, first we need ssh to be enabled between Ansible and remote server. Please use the below link to know how to configure ssh in linux?

You are not allowed to use this program (crontab)

Welcome to Linux Book Center!

I recently came to know that using my account not able to crontab on newly installed machine with RHEL 7.9. Because of this I’m not able to schedule jobs and receiving below error whenever I try to edit the crontab to schedule a job.

[Brines ~]$ crontab -e
You (Brines) are not allowed to use this program (crontab)
See crontab(1) for more information

Which means we have not configured the crontab after the OS installation.
Basically, Crontab will check for below two files when you are trying to schedule a job using cron.
/etc/cron.allow
/etc/cron.deny

First system will check for cron.allow, if the it is not available/not configured then, it will check for cron.deny neither file exist/not configured then, system will allow only root user to use cron scheduler to schedule a job.

Finally in order to allow a normal user to use crontab, We have to add the username in /etc/cron.allow file and then we are free to use the scheduler.
below is the example:


#vi /etc/cron.allow
lbcuser < newly added user
:wq


or

#echo "lbcuser" >> /etc/cron.allow

Configuration Management in puppet

Configuration Management in puppet

Will see How Configuration management puppet works in this post.

Let us take a example to create user in complex environment with different Linux distribution. To create a user we have small different in command when we go with different distribution like Red Hat, Ubuntu, CentOS,etc.

We have two method to create user without puppet help.

  1. We can directly login to the servers and will create user when the number of server is less. But, in when the server number hits more 100, its very difficult to create user manually in all user.
  2. We can create script to manage user in all servers. But, for that we should have knowledge about scripting and command different and flags(-u, -U) for each distribution. Once the script created, we need a common server which has access to all the other Linux servers.

But, using puppet we can do any type of user/group management, Package installation, service start/stop/restart, etc. By using puppet built-in resources to achieve the same operation on different distribution without worry about the underlying Operating System and commands.

By using simple code will do the necessary configuration management like
user/group management, Package installation, service start/stop/restart,etc.

Example: To create user will write below code to perform the task over all the Linux machines.

# cat user.pp
user { "lbcuser1" :
ensure => "present",
}

Same like above if you want to delete a user/ install package, etc. Solution is wring simple, robust, idempotent, extendable puppet code to the necessary configuration over remote servers.

same like that will see the code to install ntp package, which is used for network time and starting service.

# cat ntp.pp
package { "ntp":
ensure => "present",
}

service { "ntpd":
ensure => "running",
}

Like this will manage environment using puppet code. In other work managing environment using code will call as Iac(Infrastructure-as-Code).
This code will be applied over all the client machines to do the operation and will reduce the manual effort and time.

And its very essay to change the code for any modification on configuration management over all client machines.

Idempotency:
Puppet codes are idempotent by nature. Which means the results of the code remains same irrespective of the number of time we perform puppet run on nodes.puppet always ensure to keep the resources in desired state.
For example in user creation, it will check whether the user is already exist.
If the user already exist, will not perform the user creation and report us that the user already exist. Basically these checks are already in place of the puppet resources.
And if you have lines of codes to perform a action on remote machines, in such case, if any of your action already exist in any server, puppet simply will skip that action and proceed for further configuration.

These all are the good points to why we are using puppet in our environment for configuration management.

Thanks for your support and reading this post. Will post next lecture about puppet in next post.

Refernce: Puppet Docs

Setup Docker Repository

Before installing the Docker Engine on your host, you need to setup the repository first. So, will see How to setup Docker Repository in this post.
After that, you can Install/Update the Docker from the repository.

Setup Docker Repository

Setup Docker Repository:

  1. Yum should be configured on your host. Please use this post to know How to configure yum repository
  2. Than, Packages required: yum-utils, yum-config-manager and device-mapper-persistent-data, lvm2 are required for devicemapper
    Storage driver.
  3. use below command to to install above mentioned packages using yum
#yum install -y yum-utils device-mapper-persistent-data lvm2

Since the packages are already installed on my host, Update has been done

Updated:
device-mapper-persistent-data.x86_64 0:0.8.5-1.el7 lvm2.x86_64 7:2.02.185-2.el7_7.2

Use the below command to setup Docker Repository

#yum-config-manager --add-repo https://download.docker.com/linux/centos/docker-ce.repo
Loaded plugins: fastestmirror
adding repo from: https://download.docker.com/linux/centos/docker-ce.repo
grabbing file https://download.docker.com/linux/centos/docker-ce.repo to /etc/yum.repos.d/docker-ce.repo
repo saved to /etc/yum.repos.d/docker-ce.repo

And check whether the repository added or not by issuing below command

#yum repolist | grep Docker
docker-ce-stable/x86_64 Docker CE Stable - x86_64 63

Installing Docker Engine:

To confirm the successful completion of Repository setup, will try to install New version of Docker engine now using below command.

#yum install docker-ce docker-ce-cli containerd.io 

Installed:
containerd.io.x86_64 0:1.2.10-3.2.el7 docker-ce.x86_64 3:19.03.5-3.el7 docker-ce-cli.x86_64 1:19.03.5-3.el7

Dependency Installed:
container-selinux.noarch 2:2.107-3.el7 libseccomp.x86_64 0:2.3.1-3.el7


Now start the Docker Engine:

# systemctl start docker

# systemctl status docker
● docker.service - Docker Application Container Engine
Loaded: loaded (/usr/lib/systemd/system/docker.service; disabled; vendor preset: disabled)
Active: active (running) since Thu 2020-01-02 02:14:11 EST; 8s ago
Docs: https://docs.docker.com
Main PID: 60692 (dockerd)
Memory: 37.6M
CGroup: /system.slice/docker.service
└─60692 /usr/bin/dockerd -H fd:// --containerd=/run/containerd/containerd.sock

Jan 02 02:14:10 localhost dockerd[60692]: time="2020-01-02T02:14:10.667134175-05:00" level=info msg="ccResolverWrapper: sending update to cc: {[{unix:/…odule=grpc
Jan 02 02:14:10 localhost dockerd[60692]: time="2020-01-02T02:14:10.667153441-05:00" level=info msg="ClientConn switching balancer to \"pick_first\"" module=grpc
Jan 02 02:14:10 localhost dockerd[60692]: time="2020-01-02T02:14:10.695465002-05:00" level=info msg="Loading containers: start."
Jan 02 02:14:10 localhost dockerd[60692]: time="2020-01-02T02:14:10.952900918-05:00" level=info msg="Default bridge (docker0) is assigned with an IP ad…P address"
Jan 02 02:14:11 localhost dockerd[60692]: time="2020-01-02T02:14:11.018716067-05:00" level=info msg="Loading containers: done."
Jan 02 02:14:11 localhost dockerd[60692]: time="2020-01-02T02:14:11.040693143-05:00" level=warning msg="Not using native diff for overlay2, this may ca…r=overlay2
Jan 02 02:14:11 localhost dockerd[60692]: time="2020-01-02T02:14:11.041056334-05:00" level=info msg="Docker daemon" commit=633a0ea graphdriver(s)=overl…on=19.03.5
Jan 02 02:14:11 localhost dockerd[60692]: time="2020-01-02T02:14:11.041178502-05:00" level=info msg="Daemon has completed initialization"
Jan 02 02:14:11 localhost dockerd[60692]: time="2020-01-02T02:14:11.072808771-05:00" level=info msg="API listen on /var/run/docker.sock"
Jan 02 02:14:11 localhost systemd[1]: Started Docker Application Container Engine.
Hint: Some lines were ellipsized, use -l to show in full.

Now verify the Docker using below command

# docker run hello-world
Unable to find image 'hello-world:latest' locally
latest: Pulling from library/hello-world
1b930d010525: Pull complete
Digest: sha256:4fe721ccc2e8dc7362278a29dc660d833570ec2682f4e4194f4ee23e415e1064
Status: Downloaded newer image for hello-world:latest


Hello from Docker!
This message shows that your installation appears to be working correctly.


To generate this message, Docker took the following steps:
1. The Docker client contacted the Docker daemon.
2. The Docker daemon pulled the "hello-world" image from the Docker Hub.
(amd64)
3. The Docker daemon created a new container from that image which runs the
executable that produces the output you are currently reading.
4. The Docker daemon streamed that output to the Docker client, which sent it
to your terminal.


To try something more ambitious, you can run an Ubuntu container with:
$ docker run -it ubuntu bash


Share images, automate workflows, and more with a free Docker ID:
https://hub.docker.com/


For more examples and ideas, visit:
https://docs.docker.com/get-started/

Thanks for reading this post and going forward will talk about Docker Engine more…

Reference: Docker Docs

Upgrading NIOS Software

Will see Upgrading NIOS Software in this post.

Before upgrading do the pre-implementation things for safer side mentioned below.

Check the current version of Infoblox execute below command in web console

admin> show version
Upgrading NIOS Software

Check the license using below command in web console

admin> show license

Note: If the NIOS holding temp license, it’s not advisable to upgrade the Version. It will lead to lose the GUI

Now we must take the Infoblox appliance database backup. Here we are mentioning NIOS configuration and discovery files as database. If anything goes wrong, we can use this backup to restore it to previous stat of the NIOS.

Grid -> Grid Manager -> Backup -> Manual Backup
-> My Computer -> Backup
  1. Download the upgrade binaries (Bin/ Bin2) file from Infoblox support portal and do remember the path where you saved the file

https://support.infoblox.com

Step 1: 

Click on download tab and you will get next screen. From there select “NIOS Archives (.BIN/2 files)”

Upgrading NIOS Software

Step 2:  

             Once selected “NIOS Archives (.BIN/2 files)” from the dropdown list, next click on “Available for download” button

Upgrading NIOS Software

Step 3: 

      On next step you will get list of available download and from there click the appropriate version BIN or BIN2 file to download the upgrade. We can avoid “.DDI.OVA FILES” and “CHECKSUM FILES”, because it not required for the upgrade process.

Upgrading NIOS Software

Recommended to download the .BIN Files for the appropriate version.

Download and keep it in a host which in same network to upload in Grid Master GUI for upgrade and do remember the path.

Upgrading NIOS Software:

  1. Upload the binaries to Infoblox Grid Master (Grid -> Upgrade -> Upload)
  2. Once upload completed, Distribute button will be enabled. Then click on Distribute  to distribute the uploaded binaries to remote nodes (Grid -> Upgrade -> Distribute)
  3. Once distribution completed, Test button will be enabled. To verify the integrity of upgrade files click Test (Grid -> Upgrade -> Test)
  4. Finally click on upgrade to apply the update (Grid -> Upgrade -> Upgrade)

Post Upgrade of NIOS please do the below checks:

  • 1. Revert all nodes to the previous version (Grid -> Upgrade -> Revert -> Grid)

             Grid Master will display warning message. Read the warning carefully and then click Yes to proceed further.

  • In absence of Grid Master GUI, we can restore the backup to set NIOS Configuration to the previous stat.

Reference: Infoblox document

How to Register and Enable RedHat Subscriptions, Repositories for RHEL7

How to Register and Enable RedHat Subscriptions, Repositories for RHEL7

This post will guide you to know How to Register and Enable RedHat Subscriptions, Repositories for RHEL7 before system full upgrade or to install any packages from EPEL Repository in RedHat.

Enabling RedHat repositories are mandatory to install any packages using yum. RedHat subscription has the registered system details once the registration has been done.

Requierment:

All we need is newly installed system with RedHat 7.

Registering and Activating RedHat Subscrition:

As a first step we should go to the RedHat Customer portal and register there. After the successful registration do remember the credentials.

Now login to the RHEL7 server and use the below command to register your system to RedHat Customer portal with RedHat credentials which you created just before

#subscription-manager register --username <username> --password <password>

Once register your system, use the “list” option to get the all available subscription and than note down the subscription pool id which you need to activate it.

#subscription-manager list -available

if your not getting any list, than your system registration with RedHat customer portal is not purchased for subscription. Please get in touch with RedHat to proceed further.

Once you got the list of available subscription, you can use the below command to activate the subscription

#subscription-manager subscribe --pool=Pool ID number

To know the status of consumed subscription use the below command

#subscription-manager list –consumed

To list the available subscription use the below command

#subscription-manager list

Once your system registered with RedHat customer portal and activated subscription, you can enable the repositories . Use the below command to list the repositories for you subscription.

#subscription-manager repos --list

use the below command to list the available repository

#yum repolist all

To enable a specific repository, open “vi /etc/yum.repos.d/redhat.repo” file and ensure that “enbaled=1” for concern repository which you want to enable

Now list only enabled repository by executing below command

#yum repolist

Now you can use required yum commands to update your system/ install any packages like below

#yum update
#yum install <package_name>

Reference: RedHat portal

How to install Nagios Core server 4.4.3 on RHEL 6/7 & CentOS 6/7

This post will help you to know How to install Nagios Core server 4.4.3 on RHEL 6/7 & CentOS 6/7.

Nagios is a powerful monitoring tool. It will help to monitor a infrastructure.

It will monitor applications, service and entire infrastructure.

Required Packages:

  1. httpd
  2. php
  3. php-cli
  4. gcc
  5. unzip
  6. wget
  7. glibc
  8. glibc-common
  9. gd
  10. gd-devel
  11. net-snmp
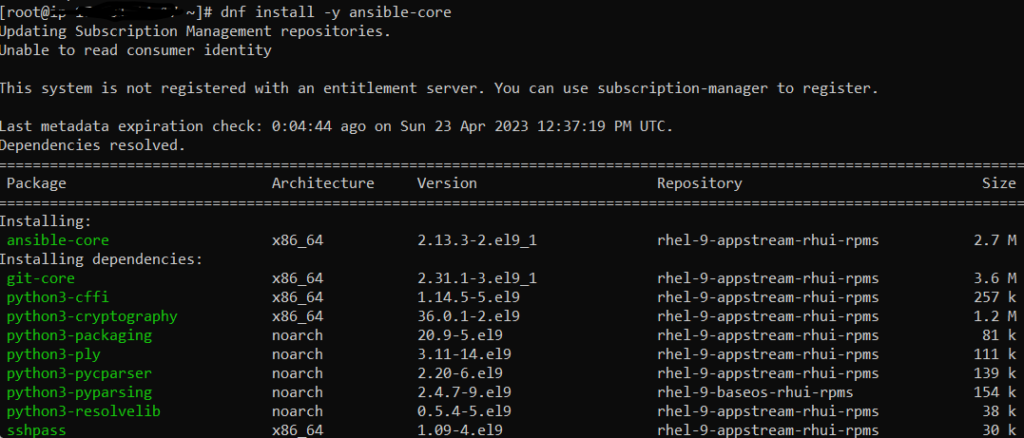
[root@nagiosrv ~]yum install httpd php php-cli gcc unzip wget glibc glibc-common gd gd-devel net-snmp

As we have installed httpd and this will be useful when we access the Nagios core to manage through web console.

 [root@nagiosrv yumrepo]# systemctl start httpd 

Now create Nagios user account using below command:

[root@nagiosrv yumrepo]# useradd Nagios
[root@nagiosrv yumrepo]# passwd nagios
Changing password for user nagios.
New password:
BAD PASSWORD: The password contains the user name in some form
Retype new password:
passwd: all authentication tokens updated successfully.

Now we need to create a group “nagcmd” to setup Nagios and then add the users “nagios” & “apache”   to be a part of group: nagcmd

[root@nagiosrv yumrepo]# groupadd nagcmd
[root@nagiosrv yumrepo]# usermod -a -G nagcmd nagios
[root@nagiosrv yumrepo]# usermod -a -G nagcmd apache

Ñow its time to start Nagios Core server installation

Since Nagios third party tool, we need to download first for installation using below commands:

[root@nagiosrv ~]# cd /opt
[root@nagiosrv opt]# wget https://assets.nagios.com/downloads/nagioscore/releases/nagios-4.4.3.tar.gz
[root@nagiosrv opt]# tar -xvf nagios-4.4.3.tar.gz
[root@nagiosrv nagios-4.4.3]# ./configure --with-command-group=nagcmd
[root@nagiosrv nagios-4.4.3]# make all
[root@nagiosrv nagios-4.4.3]# make install
[root@nagiosrv nagios-4.4.3]# make install-init
[root@nagiosrv nagios-4.4.3]# make install-daemoninit
[root@nagiosrv nagios-4.4.3]# make install-commandmode
[root@nagiosrv nagios-4.4.3]# make install-config
[root@nagiosrv nagios-4.4.3]# make install-exfoliation

Now configure Apache for Nagios installation using below command:

[root@nagiosrv nagios-4.4.3]# make install-webconf

Will configure Apache authentication for nagiosadmin which is default user. Don’t change this username. If you are changing then need to do more changes in configuration file.

[root@nagiosrv nagios-4.4.3]# htpasswd -c /usr/local/nagios/etc/htpasswd.users nagiosadmin

Now restart the apache

[root@nagiosrv nagios-4.4.3]# systemctl restart httpd

As a next step need to install Nagios plugins, once installed Nagios core using below commands:

[root@nagiosrv nagios-4.4.3]# cd /opt
[root@nagiosrv opt]# wget http://nagios-plugins.org/download/nagios-plugins-2.2.1.tar.gz
[root@nagiosrv opt]# tar -xvf nagios-plugins-2.2.1.tar.gz
[root@nagiosrv opt]# cd nagios-plugins-2.2.1

Now install and compile the plugins using below command:

[root@nagiosrv nagios-plugins-2.2.1]# ./configure --with-nagios-user=nagios --with-nagios-group=Nagios
[root@nagiosrv nagios-plugins-2.2.1]# make
[root@nagiosrv nagios-plugins-2.2.1]# make install

We installed Nagios core and plugins. So, now will check and verify the configuration using below command:

[root@nagiosrv nagios-plugins-2.2.1]#
/usr/local/nagios/bin/nagios -v /usr/local/nagios/etc/nagios.cfg

The output should give 0 Errors and 0 Warnings. If you get the same, then will start the Nagios like below

[root@nagiosrv nagios-plugins-2.2.1]# systemctl start
nagios     

Check SELinux mode using below command:

[root@nagiosrv ~]getenforce
Enforcing

If SELinux is in Enforcing mode, Than change it to Permissive mode or disable it like below

[root@nagiosrv ~]# setenforce 0

Now make sure to enable web server permanently in firewall using below command:

[root@nagiosrv ~]# firewall-cmd --permanent
--add-service=http

Execute below command to make affect in firewall changes which we did using our previous command

[root@nagiosrv ~]# firewall-cmd –reload

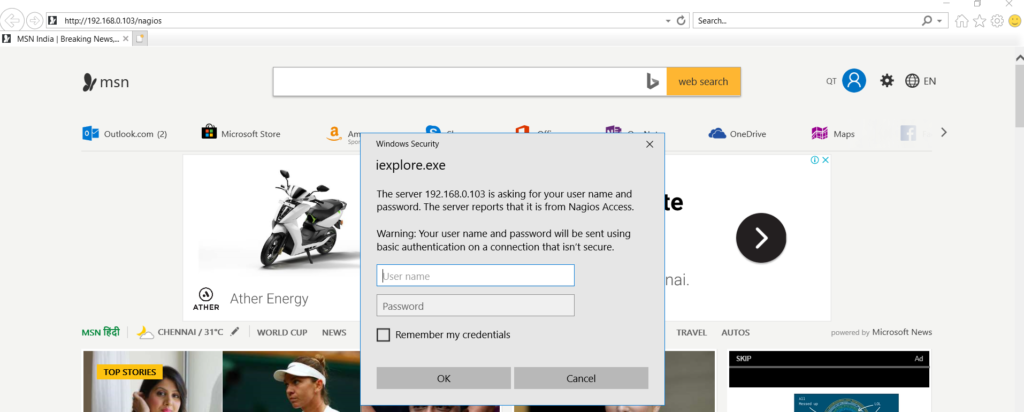
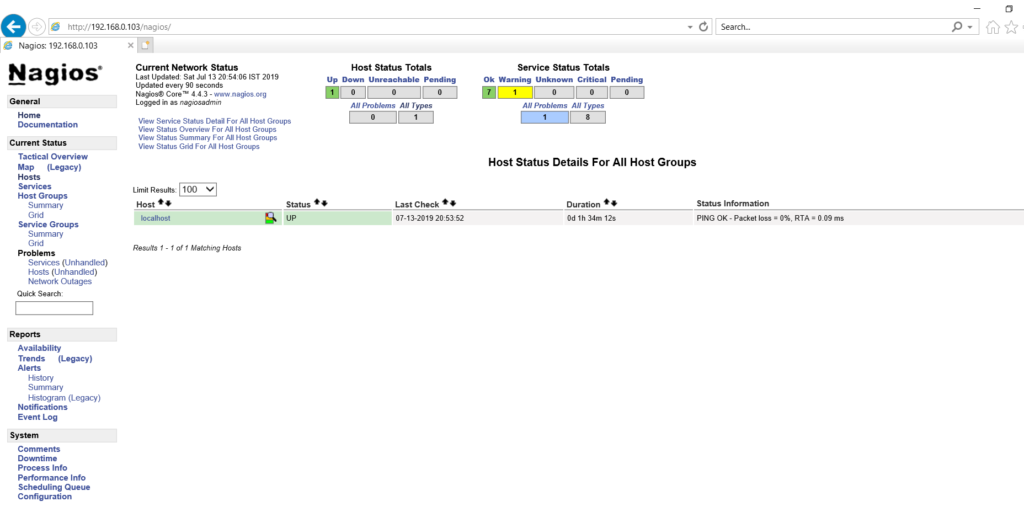
Finally we have done everything and now will check whether the web console working on not

Enter url like below in your web browser and replace the IP_ADDR with your server ip

http://IP_ADDR/nagios

It will ask for the username and password. Remember that we already created a user name “nagiosadmin”. We can use that to login the console.

How to install Nagios Core server 4.4.3 on RHEL 6/7 & CentOS 6/7

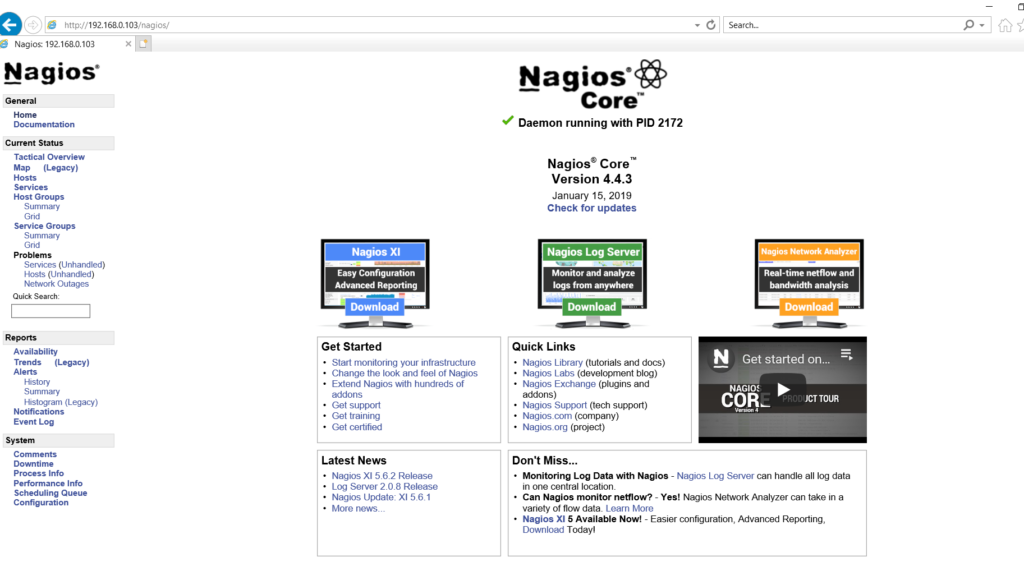
Enter the nagiosadmin credentials and the web console looks like below

How to install Nagios Core server 4.4.3 on RHEL 6/7 & CentOS 6/7

From the left side pan click on “Hosts” and it will show list of hosts which is added for monitoring.
Since, we doesn’t added any host, it will show only localhost, which is Nagios server like below

How to install Nagios Core server 4.4.3 on RHEL 6/7 & CentOS 6/7

Finally we installed and configured Nagios server. Thanks for readin

How to boot with an old kernel in RHEL4,5,6/CentOS

In this post, we are going to see How to boot with an old kernel in RHEL4,5,6/CentOS Operating systems.

How to boot with an old kernel in RHEL4,5,6/CentOS

RedHat Operating System uses GRUB boot loader as default one globally.

We can boot update the kernel using Yum/ RPM Package management like other package upgrades which we are doing.

Use the below command to know which boot loader installed on your OS.

#grubby -bootloader-probe

Changing kernel:

/boot/grub/grub.conf is the grub configuration file.

#cat /boot/grub/grub.conf 

default=0 timeout=5 password --encrypted $6$GXGrYVEnbKXAnQoT$p64OkyclNDt4qM2q47GMsgNxJxQaclNs79gvYYsl4h07ReDtJpt5P5kQn1KQ52u2eW8pKHTqcG50ffv0UlRcW0 splashimage=(hd0,0)/grub/splash.xpm.gz hiddenmenu title Red Hat Enterprise Linux 6.4 (2.6.32-358.el6.x86_64) ===> kernel 0 root (hd0,0) kernel /vmlinuz-2.6.32-358.el6.x86_64 ro root=/dev/mapper/vg_geeklab-lv_root rd_NO_LUKS KEYBOARDTYPE=pc KEYTABLE=us LANG=en_US.UTF-8 rd_NO_MD SYSFONT=latarcyrheb-sun16 crashkernel=auto rd_LVM_LV=vg_geeklab/lv_swap rd_LVM_LV=vg_geeklab/lv_root rd_NO_DM rhgb quiet initrd /initramfs-2.6.32-358.el6.x86_64.img title Red Hat Enterprise Linux 6.3 (2.6.32-279.el6.x86_64) ===> kernel 1 root (hd0,0) kernel /vmlinuz-2.6.32-279.el6.x86_64 ro root=/dev/mapper/vg_geeklab-lv_root rd_NO_LUKS KEYBOARDTYPE=pc KEYTABLE=us LANG=en_US.UTF-8 rd_NO_MD SYSFONT=latarcyrheb-sun16 crashkernel=auto rd_LVM_LV=vg_geeklab/lv_swap rd_LVM_LV=vg_geeklab/lv_root rd_NO_DM rhgb quiet initrd /initramfs-2.6.32-279.el6.x86_64.img

In this, we can see Default will be 0. From this, we can understand OS will read by the default top kernel.

Whenever we are upgrading the kernel that will be coming up and considered as 0 and old kernel will be marked as 1.

So, We should change the number from “0” to “1” on below line of /boot/grub/grub.conf file using vi editor and save it.

default=1

We done the needed configuration change to boot the OS with an old kernel.

On the next boot it will take effect.

Using below command reboot the system and then check whether its booting with old kernel or new one.

#shutdown -r now

Use the below command to check the kernel versions which is in use right now

#uname -r

awk command in linux

awk command in linux

We are going to see how to use awk command in Linux in this post.

It’s a scripting language and it’s used to generate Reports and Data Manipulation.

Syntax:

#awk <option> 'criteria {action}' input_file > output_file

Awk command to print file content:

[root@localhost ~]# awk '{print}' testfile.txt
Abu 1234
Thahir 5678
Tharun 9101
Rishi 2345

Above example is only to print all the content of a file.

Awk command to print the lines which match with the given pattern:

[root@localhost ~]# awk '/Rishi/{print}' testfile.txt
Rishi 2345

awk command to split a line to fields:

$1 will be considered the first word as the first field in a line. accordingly $2,$3, etc…

[root@localhost ~]# awk '{print $2}' testfile.txt
1234
5678
9101
2345
[root@localhost ~]#

Built-in variables in awk:

NF:     We can print the last field of the lines by using NF in awk command

Example: 

[root@localhost ~]# awk '{print $NF}' testfile.txt
25000
30000
20000
15000

NR:     Using NR built-in option, we can print the specific fields along with line numbers and can print all content of a file along with the line numbers. Also, we can print the range of lines using NR in awk command.

Examples:

1. Displaying specific row with a specific field in a file

[root@localhost ~]# awk 'NR==2 {print $1,$3}' testfile.txt
Thahir 30000

2.Displaying content of a range of lines(from 2 to 4th line)

[root@localhost ~]# awk 'NR==2, NR==4 {print $1,$3}' testfile.txt
Thahir 30000
Tharun 20000
Rishi 15000


Thanks for reading our blog. Please drop your comments.

How to install Ansible on RHEL7/ CentOS7

We are going to see how to install Ansible on RHEL7/ CentOS7 in this post.

Control node needs to install Python 2.6 or latest version and windows doesn’t support for control node.

Since the ansible agentless tool, on Managed hosts no need to install any specific agent/client. And need to install python 2.4 or latest version on managed hosts.

How to install Ansible on RHEL7/ CentOS7

Installing Ansible on RHEL7/ CentOS7:

To install the Ansible we should have Enabled EPEL repository on our server already

Once enable EPEL Repo, then we can start installing Ansible using yum.

[root@localhost ~]# yum install ansible -y

Post installation of ansible will check the version of Ansible by using below command

[root@localhost ~]# ansible --version
ansible 2.7.9
 config file = /etc/ansible/ansible.cfg
 configured module search path = [u'/root/.ansible/plugins/modules', u'/usr/share/ansible/plugins/modules']
 ansible python module location = /usr/lib/python2.7/site-packages/ansible
 executable location = /usr/bin/ansible
 python version = 2.7.5 (default, Aug 2 2016, 04:20:16) [GCC 4.8.5 20150623 (Red Hat 4.8.5-4)]
[root@localhost ~]#

Finally, we installed ansible over our machine which we are going to take it as a control node.

Hereafter if we want to deploy or manage any remote hosts(Managed Host) from the control node, SSH authentication is mandatory. So, We should copy and paste the SSH keys to the remote hosts to make the communication available between the control and managed node.


Reference: Ansible documented site