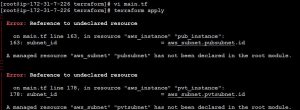
Docker push – Error – requested access to the resource is denied
exact error: Error: writing blob: initiating layer upload to /v2/shaikabuthagirs/myrepo/blobs/uploads/ in registry-1.docker.io: requested access to the resource is denied
Cause:
While i’m using simply below command to establish connection with hub.docker.com, it is connecting with some other repository instead of docker.io
#docker login
because of the, we are getting above error while trying to push image from server to hub.docker.com
Solution:
We need to login to docker.io repository to fix this issue. So for that we need to mention the repository as well along with #docker login command like below
[ec2-user@ip-172-31-40-126 ~]$ docker login -u shaikabuthagirs -p "Thagir@56" docker.io
Emulate Docker CLI using podman. Create /etc/containers/nodocker to quiet msg.
Login Succeeded!
Now create tag before pushing it to hub and below is the command
[ec2-user@ip-172-31-40-126 nginx]$ docker images
Emulate Docker CLI using podman. Create /etc/containers/nodocker to quiet msg.
REPOSITORY TAG IMAGE ID CREATED SIZE
localhost/mynginx latest 136dabf8f70c 17 minutes ago 196 MB

#docker tag mynginx:latest shaikabuthagirs/nginx:v1
mynginx :latest -> my customized image: tag name(This can be like versioning and you can name it as per your own requirement)
shaikabuthagirs/nginx:v1 -> shaikabuthagirs(My docker hub account name)/nginx(repository which I created in my account):v1(tag name. As I said im using here as version 1)
After tag creation i’m listing images again
[ec2-user@ip-172-31-40-126 nginx]$ docker images
Emulate Docker CLI using podman. Create /etc/containers/nodocker to quiet msg.
REPOSITORY TAG IMAGE ID CREATED SIZE
localhost/shaikabuthagirs/nginx v1 136dabf8f70c 19 minutes ago 196 MB
localhost/mynginx latest 136dabf8f70c 19 minutes ago 196 MB
You can see the tagged image showing now and now we can push it to docker hub using below command
[ec2-user@ip-172-31-40-126 nginx]$ docker push shaikabuthagirs/nginx:v1
Emulate Docker CLI using podman. Create /etc/containers/nodocker to quiet msg.
Getting image source signatures
Copying blob bd98674871f5 skipped: already exists
Copying blob 2b99b9c5d9e5 skipped: already exists
Copying blob 1e109dd2a0d7 skipped: already exists
Copying blob ec04bab23527 skipped: already exists
Copying blob 566e42bcee1c skipped: already exists
Copying blob da8cc133ff82 skipped: already exists
Copying blob 7753612990f4 done |
Copying blob c44f27309ea1 skipped: already exists
Copying config 136dabf8f7 done |
Writing manifest to image destination
[ec2-user@ip-172-31-40-126 nginx]$
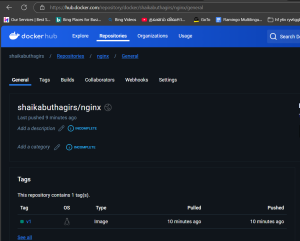
Now the image has been pushed into the hub.docker.com and see the below screenshot after the push
Thanks for reading the post and looking for your support always!