Hi Everyone ! Will see Linux interview questions in this post. Many of them are getting difficulty on finding their job in Linux, without knowing the scenario-based question in Linux. So, we decided to help by sharing some Linux interview questions.
1. Explain Linux booting process: We already shared in another post regarding booting process in RHEL. Please make use of it to know brief about linux booting.
2. What is port number for http/https/nfs/dns/dhcp/telnet/ssh/ftp? https: 443, http: 80, nfs:111 and 2049, DNS: 245, dhcp: 546(client) 547 (server) 67 and 68
3. Explain architecture of ansible? Ansible architecture has been posted. Please read this post to know more.
4. What is split brain syndrome in vcs cluster? We already shred a post to know what is split brain syndrome in vcs. Please read that to know more.
5. How boot a linux host using old kernel, if new kernel update fails? Steps are shared in a post to know how to boot linux host with old kernel? Please read that post to know more.
8. Explain steps to configure LVM? Please check the post which we shared earlier to know How to configure LVM?
9. What is the command to know whether one port is enabled or not in Linux? netstat command will help to know the listening port and need to use grep to filter #netstat -tulpn | grep 8080
Will keep on update this post and if you have any question to know answer in Linux. Please
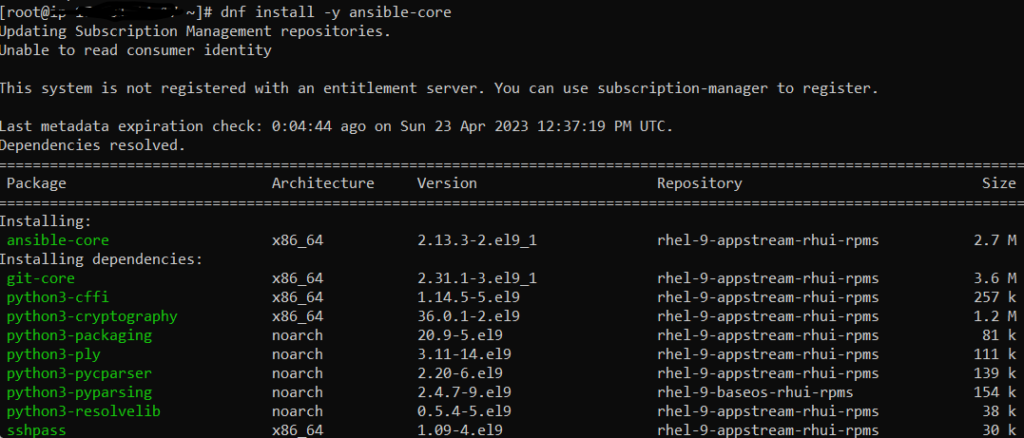
Ansible is a free and open-source automation tool and it is available in default package repository/App Stream and no need any special repository to be enabled.
Step 1: Install ansible using dnf command
#dnf install -y ansible-core
Once installed, very its version by running below command and we can say this as verifiting whether the ansible or not in our server.
#ansible -version
We can check this by executing something over remote servers using this ansible server. For that, first we need ssh to be enabled between Ansible and remote server. Please use the below link to know how to configure ssh in linux?
I recently came to know that using my account not able to crontab on newly installed machine with RHEL 7.9. Because of this I’m not able to schedule jobs and receiving below error whenever I try to edit the crontab to schedule a job.
[Brines ~]$ crontab -e
You (Brines) are not allowed to use this program (crontab)
See crontab(1) for more information
Which means we have not configured the crontab after the OS installation. Basically, Crontab will check for below two files when you are trying to schedule a job using cron. /etc/cron.allow /etc/cron.deny
First system will check for cron.allow, if the it is not available/not configured then, it will check for cron.deny neither file exist/not configured then, system will allow only root user to use cron scheduler to schedule a job.
Finally in order to allow a normal user to use crontab, We have to add the username in /etc/cron.allow file and then we are free to use the scheduler. below is the example:
#vi /etc/cron.allow lbcuser < newly added user :wq
Will see How Configuration management puppet works in this post.
Let us take a example to create user in complex environment with different Linux distribution. To create a user we have small different in command when we go with different distribution like Red Hat, Ubuntu, CentOS,etc.
We have two method to create user without puppet help.
We can directly login to the servers and will create user when the number of server is less. But, in when the server number hits more 100, its very difficult to create user manually in all user.
We can create script to manage user in all servers. But, for that we should have knowledge about scripting and command different and flags(-u, -U) for each distribution. Once the script created, we need a common server which has access to all the other Linux servers.
But, using puppet we can do any type of user/group management, Package installation, service start/stop/restart, etc. By using puppet built-in resources to achieve the same operation on different distribution without worry about the underlying Operating System and commands.
By using simple code will do the necessary configuration management like user/group management, Package installation, service start/stop/restart,etc.
Example: To create user will write below code to perform the task over all the Linux machines.
Same like above if you want to delete a user/ install package, etc. Solution is wring simple, robust, idempotent, extendable puppet code to the necessary configuration over remote servers.
same like that will see the code to install ntp package, which is used for network time and starting service.
Like this will manage environment using puppet code. In other work managing environment using code will call as Iac(Infrastructure-as-Code). This code will be applied over all the client machines to do the operation and will reduce the manual effort and time.
And its very essay to change the code for any modification on configuration management over all client machines.
Idempotency: Puppet codes are idempotent by nature. Which means the results of the code remains same irrespective of the number of time we perform puppet run on nodes.puppet always ensure to keep the resources in desired state. For example in user creation, it will check whether the user is already exist. If the user already exist, will not perform the user creation and report us that the user already exist. Basically these checks are already in place of the puppet resources. And if you have lines of codes to perform a action on remote machines, in such case, if any of your action already exist in any server, puppet simply will skip that action and proceed for further configuration.
These all are the good points to why we are using puppet in our environment for configuration management.
Thanks for your support and reading this post. Will post next lecture about puppet in next post.
Ansible is opensource automation tool and will see how to patch linux servers using ansible in this post.
We are going to use RedHat Linux 7.3 Operating System in this practical.
Requirements: 1. Linux Host Installed with Ansible and Yum repository configured with httpd. 2. Linux Host Installed with RHEL 7.4 -> Node machine 3. Since Ansible requires SSH enabled between ansible master and node and don’t have node package, Make sure SSH connection established between Master and node.
4. Run createrepo, “yum clean all” & “yum makecache” commands to update the repository along with new RPM’s.
Now the repository is ready for patching.
Ansible playbook for Linux patching:
Login to Ansible Host and change directory to /etc/ansible
#cd /etc/ansible
2. create playbook called “patching.yml” with below content
# vi patching.yml
---
- name: Patch Linux system
  hosts: Linux_Servers
  become: true
  ignore_errors: yes
  tasks:
- name: Copy the Kernel Patch Repo File
  copy:
    src: /etc/yum.repos.d/yum.repo
    dest: /etc/yum.repos.d/
- name: Apply patches
  yum:
     name: kernel
     state: latest
3. Edit /etc/ansible/hosts file and provide Linux hosts which needs to be patched and mention group as “Linux_Servers” for those hosts. Host group name has been mentioned in playbook in “hosts: Linux_Servers” portion.
Docker Inc still didnt replease Docker for RHEL8/ CentOS 8. So, we can use alternate one which is used for RHEL7/ CentOS7
# curl https://download.docker.com/linux/centos/docker-ce.repo -o /etc/yum.repos.d/docker-ce.repo

  % Total    % Received % Xferd  Average Speed   Time    Time     Time  Current

                                 Dload  Upload   Total   Spent    Left  Speed

100  2424  100  2424    0     0  22238      0 --:--:-- --:--:-- --:--:-- 22238
Docker community edition requires container.io => 1.2.2.3. But, its not available for RHEL/ CentOS 8. So, we need to skip and proceed the the docker installation in our own RISK.
# yum install docker-ce
 Docker CE Stable - x86_64                                                                                                                16 kB/s |  21 kB     00:01
 Error:
  Problem: package docker-ce-3:19.03.5-3.el7.x86_64 requires containerd.io >= 1.2.2-3, but none of the providers can be installed

cannot install the best candidate for the job
package containerd.io-1.2.10-3.2.el7.x86_64 is excluded
package containerd.io-1.2.2-3.3.el7.x86_64 is excluded
package containerd.io-1.2.2-3.el7.x86_64 is excluded
package containerd.io-1.2.4-3.1.el7.x86_64 is excluded
package containerd.io-1.2.5-3.1.el7.x86_64 is excluded
package containerd.io-1.2.6-3.3.el7.x86_64 is excluded
 (try to add '--skip-broken' to skip uninstallable packages or '--nobest' to use not only best candidate packages)
Installing docker by skipping unavailable packages
Now Docker Version “3:18.09.1-3.el7.x86_64” has been installed.S
Start and enable the Docker service by using below command
# systemctl start docker

# systemctl enable docker
 Created symlink /etc/systemd/system/multi-user.target.wants/docker.service â /usr/lib/systemd/system/docker.service.
Check the docker service status
# systemctl status docker
 â docker.service - Docker Application Container Engine
    Loaded: loaded (/usr/lib/systemd/system/docker.service; enabled; vendor preset: disabled)
    Active: active (running) since Fri 2020-01-17 05:37:17 UTC; 2min 4s ago
      Docs: https://docs.docker.com
  Main PID: 15635 (dockerd)
     Tasks: 18
    Memory: 53.5M
    CGroup: /system.slice/docker.service
            ââ15635 /usr/bin/dockerd -H fd://
            ââ15649 containerd --config /var/run/docker/containerd/containerd.toml --log-level info
Jan 17 05:37:17 ip-172-31-44-32.us-east-2.compute.internal dockerd[15635]: time="2020-01-17T05:37:17.341886251Z" level=info msg="Graph migration to content-addressabil>
 Jan 17 05:37:17 ip-172-31-44-32.us-east-2.compute.internal dockerd[15635]: time="2020-01-17T05:37:17.342289173Z" level=warning msg="Your kernel does not support cgroup>
 Jan 17 05:37:17 ip-172-31-44-32.us-east-2.compute.internal dockerd[15635]: time="2020-01-17T05:37:17.342309354Z" level=warning msg="Your kernel does not support cgroup>
 Jan 17 05:37:17 ip-172-31-44-32.us-east-2.compute.internal dockerd[15635]: time="2020-01-17T05:37:17.342708097Z" level=info msg="Loading containers: start."
 Jan 17 05:37:17 ip-172-31-44-32.us-east-2.compute.internal dockerd[15635]: time="2020-01-17T05:37:17.556082824Z" level=info msg="Default bridge (docker0) is assigned w>
 Jan 17 05:37:17 ip-172-31-44-32.us-east-2.compute.internal dockerd[15635]: time="2020-01-17T05:37:17.654816733Z" level=info msg="Loading containers: done."
 Jan 17 05:37:17 ip-172-31-44-32.us-east-2.compute.internal dockerd[15635]: time="2020-01-17T05:37:17.681089736Z" level=info msg="Docker daemon" commit=4c52b90 graphdri>
 Jan 17 05:37:17 ip-172-31-44-32.us-east-2.compute.internal dockerd[15635]: time="2020-01-17T05:37:17.681241065Z" level=info msg="Daemon has completed initialization"
 Jan 17 05:37:17 ip-172-31-44-32.us-east-2.compute.internal dockerd[15635]: time="2020-01-17T05:37:17.717122644Z" level=info msg="API listen on /var/run/docker.sock"
 Jan 17 05:37:17 ip-172-31-44-32.us-east-2.compute.internal systemd[1]: Started Docker Application Container Engine.
Now check the Docker installation by running a container using anyone the base image
# docker run -it hello-world
 Unable to find image 'hello-world:latest' locally
 latest: Pulling from library/hello-world
 1b930d010525: Pull complete
 Digest: sha256:9572f7cdcee8591948c2963463447a53466950b3fc15a247fcad1917ca215a2f
 Status: Downloaded newer image for hello-world:latest

 Hello from Docker!
 This message shows that your installation appears to be working correctly.

To generate this message, Docker took the following steps:
The Docker client contacted the Docker daemon.
The Docker daemon pulled the "hello-world" image from the Docker Hub.
 (amd64)
The Docker daemon created a new container from that image which runs the
 executable that produces the output you are currently reading.
The Docker daemon streamed that output to the Docker client, which sent it
 to your terminal.

To try something more ambitious, you can run an Ubuntu container with:
  $ docker run -it ubuntu bash

Share images, automate workflows, and more with a free Docker ID:
  https://hub.docker.com/

For more examples and ideas, visit:
  https://docs.docker.com/get-started/
Allowing non root users:
Check whether group called “Docker” availavle or not
# cat /etc/group | grep docker

docker:x:989:
Since group already exists, Now create a new user
# useradd abu
Check created users details like default UID, GID/ Groups added
# id abu
 uid=1001(abu) gid=1001(abu) groups=1001(abu)
Now add “abu” user to “Docker” group as another group.
# usermod -aG docker abu

# id abu
 uid=1001(abu) gid=1001(abu) groups=1001(abu),989(docker)
Now we can use this user to run docker instead if using root user.
Before installing the Docker Engine on your host, you need to setup the repository first. So, will see How to setup Docker Repository in this post. After that, you can Install/Update the Docker from the repository.
# systemctl status docker ● docker.service - Docker Application Container Engine Loaded: loaded (/usr/lib/systemd/system/docker.service; disabled; vendor preset: disabled) Active: active (running) since Thu 2020-01-02 02:14:11 EST; 8s ago Docs: https://docs.docker.com Main PID: 60692 (dockerd) Memory: 37.6M CGroup: /system.slice/docker.service └─60692 /usr/bin/dockerd -H fd:// --containerd=/run/containerd/containerd.sock
Jan 02 02:14:10 localhost dockerd[60692]: time="2020-01-02T02:14:10.667134175-05:00" level=info msg="ccResolverWrapper: sending update to cc: {[{unix:/…odule=grpc Jan 02 02:14:10 localhost dockerd[60692]: time="2020-01-02T02:14:10.667153441-05:00" level=info msg="ClientConn switching balancer to \"pick_first\"" module=grpc Jan 02 02:14:10 localhost dockerd[60692]: time="2020-01-02T02:14:10.695465002-05:00" level=info msg="Loading containers: start." Jan 02 02:14:10 localhost dockerd[60692]: time="2020-01-02T02:14:10.952900918-05:00" level=info msg="Default bridge (docker0) is assigned with an IP ad…P address" Jan 02 02:14:11 localhost dockerd[60692]: time="2020-01-02T02:14:11.018716067-05:00" level=info msg="Loading containers: done." Jan 02 02:14:11 localhost dockerd[60692]: time="2020-01-02T02:14:11.040693143-05:00" level=warning msg="Not using native diff for overlay2, this may ca…r=overlay2 Jan 02 02:14:11 localhost dockerd[60692]: time="2020-01-02T02:14:11.041056334-05:00" level=info msg="Docker daemon" commit=633a0ea graphdriver(s)=overl…on=19.03.5 Jan 02 02:14:11 localhost dockerd[60692]: time="2020-01-02T02:14:11.041178502-05:00" level=info msg="Daemon has completed initialization" Jan 02 02:14:11 localhost dockerd[60692]: time="2020-01-02T02:14:11.072808771-05:00" level=info msg="API listen on /var/run/docker.sock" Jan 02 02:14:11 localhost systemd[1]: Started Docker Application Container Engine. Hint: Some lines were ellipsized, use -l to show in full.
Now verify the Docker using below command
# docker run hello-world
     Unable to find image 'hello-world:latest' locally
     latest: Pulling from library/hello-world
     1b930d010525: Pull complete
     Digest: sha256:4fe721ccc2e8dc7362278a29dc660d833570ec2682f4e4194f4ee23e415e1064
     Status: Downloaded newer image for hello-world:latest


Hello from Docker!
     This message shows that your installation appears to be working correctly.


To generate this message, Docker took the following steps:
      1. The Docker client contacted the Docker daemon.
      2. The Docker daemon pulled the "hello-world" image from the Docker Hub.
         (amd64)
      3. The Docker daemon created a new container from that image which runs the
         executable that produces the output you are currently reading.
      4. The Docker daemon streamed that output to the Docker client, which sent it
         to your terminal.


To try something more ambitious, you can run an Ubuntu container with:
      $ docker run -it ubuntu bash


Share images, automate workflows, and more with a free Docker ID:
      https://hub.docker.com/


For more examples and ideas, visit:
      https://docs.docker.com/get-started/
Thanks for reading this post and going forward will talk about Docker Engine more…
Before upgrading do the pre-implementation things for safer side mentioned below.
Check the current version of Infoblox execute below command in web console
admin> show version
Check the license using below command in web console
admin> show license
Note: If the NIOS holding temp license, it’s not advisable to upgrade the Version.
It will lead to lose the GUI
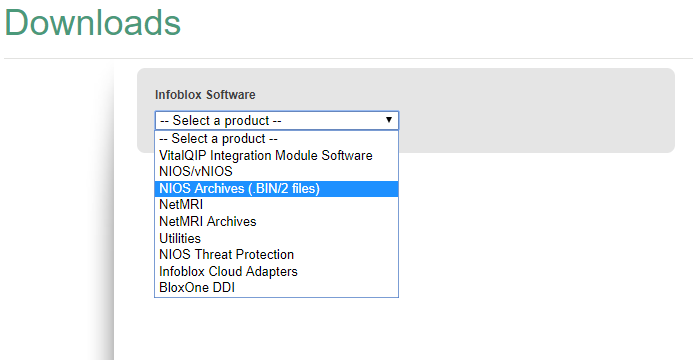
Now we must take the Infoblox appliance database backup. Here we are mentioning NIOS configuration and discovery files as database. If anything goes wrong, we can use this backup to restore it to previous stat of the NIOS.
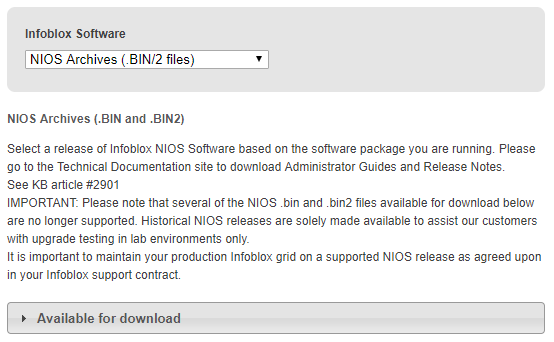
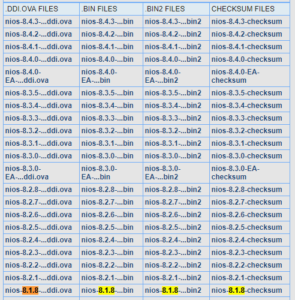
Click on download tab and you will get next screen. From there select “NIOS Archives (.BIN/2 files)”
Step 2:
Once selected “NIOS Archives
(.BIN/2 files)” from the dropdown list, next click on “Available for
download” button
Step 3:
On next step you will get list of
available download and from there click the appropriate version BIN or BIN2
file to download the upgrade. We can avoid “.DDI.OVA FILES” and “CHECKSUM
FILES”, because it not required for the upgrade process.
Recommended to download the .BINFiles for the appropriate version.
Download and keep it in a host which in same network to upload in Grid Master GUI for upgrade and do remember the path.
Upgrading NIOS Software:
Upload the binaries to Infoblox
Grid Master (Grid -> Upgrade -> Upload)
Once upload completed, Distribute
button will be enabled. Then click on Distribute to distribute the uploaded binaries to remote
nodes (Grid -> Upgrade -> Distribute)
Once distribution completed, Test
button will be enabled. To verify the integrity of upgrade files click Test (Grid
-> Upgrade -> Test)
Finally click on upgrade
to apply the update (Grid -> Upgrade -> Upgrade)
Post Upgrade of NIOS please do the below checks:
1. Revert all nodes to the
previous version (Grid -> Upgrade -> Revert -> Grid)
Grid Master will display warning message. Read the warning carefully and then click Yes to proceed further.
In absence of Grid Master GUI,
we can restore the backup to set NIOS Configuration to the previous stat.
We are going to learn how to install RHEL 8 Operating system in this post. It supports “Appliction Stream” which will allow developer tools and read our previous post to know more about RHEL 8 features.
Minimum System Requirements:
4 GB RAM
20 GB unallocated disk space
64-bit x86 or ARM System
and it will supports below architecture,
AMD or Intel x86 64-bit
64-bit ARM
IBM Power Systems, Little Endian & IBM Z
Keep the RHEL 8 Media or Image file ready to start the installation. Use the below link to download RHEL 8
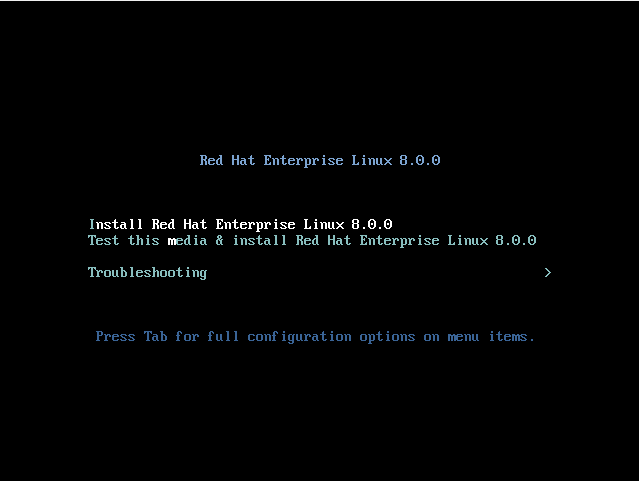
Boot the system using RHEL 8 media or image file and it will start the installation like below and by using “Tab” select “RedHat Enterprise Linux 8.0.0″and press “Enter” key in keyboard to start the installation.
On next screen, you will get a list that is asking you to select the System language and keyboard layout like below. Select your preferred language and click on continue
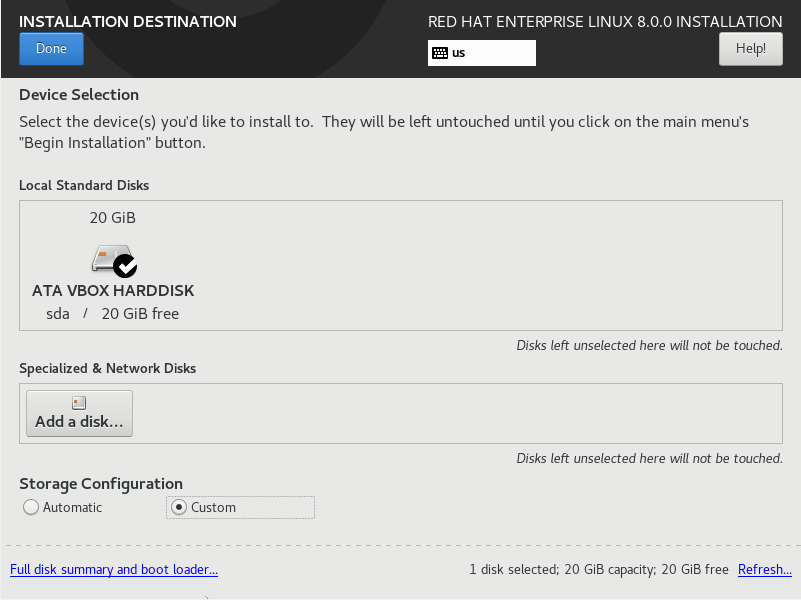
Then next you will get a screen which is the place to provide all information to install the operating system. Click on “Installation Destination” for partitioning.
In next screen, select “Automatic” for auto partitioning, which is done by Operating System itself. In this option i will take all the available disk for installation
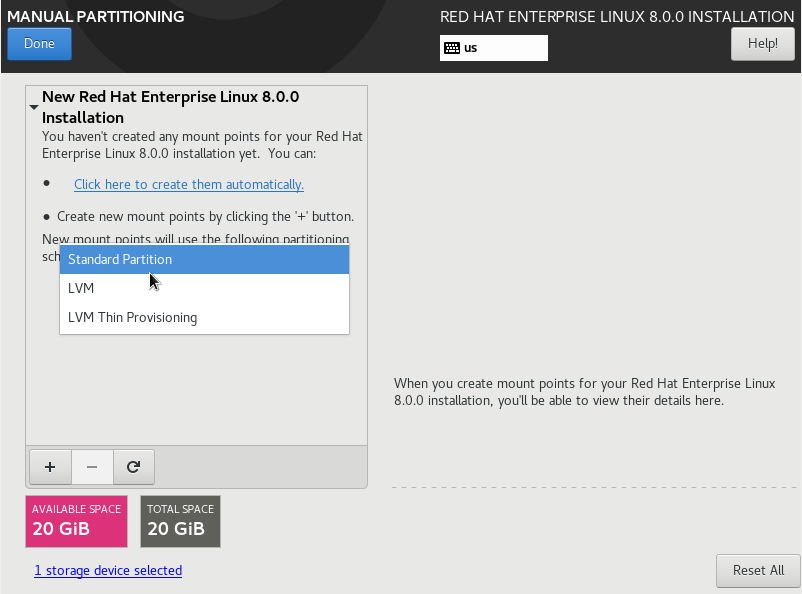
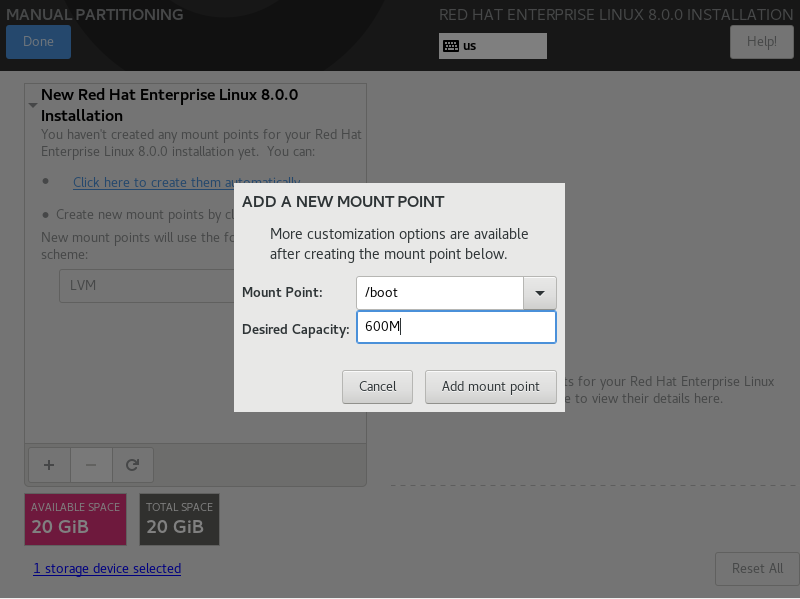
Select “Custom” to do partitioning by yourself. Here you need to select the required mount points and size concern to that mounts. Default mount points will be /(root), swap, /boot. See the below screenshots of custom partitioning which i done in this installation.
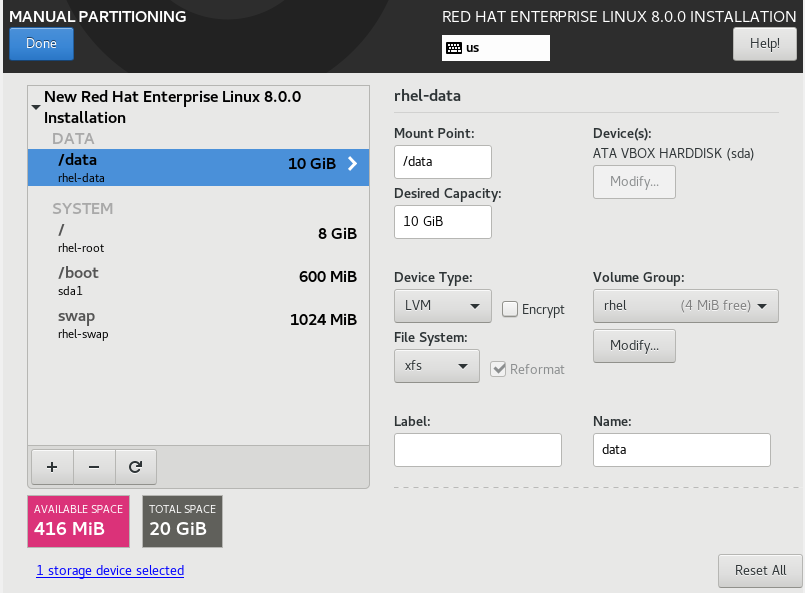
Select the partition type “Standard Partition, LVM, LVM Thin Provisioning” which type you want to create partition. Here i selected LVM type for this installation. LVM is best option where you can extend or reduce the partition size whenever needed.
Select Filesystem(partition) and provide size of the filesystem like below
Finally i have created few of the filesystems using available disk space with LVM. Click on done from the top left side of the screen.
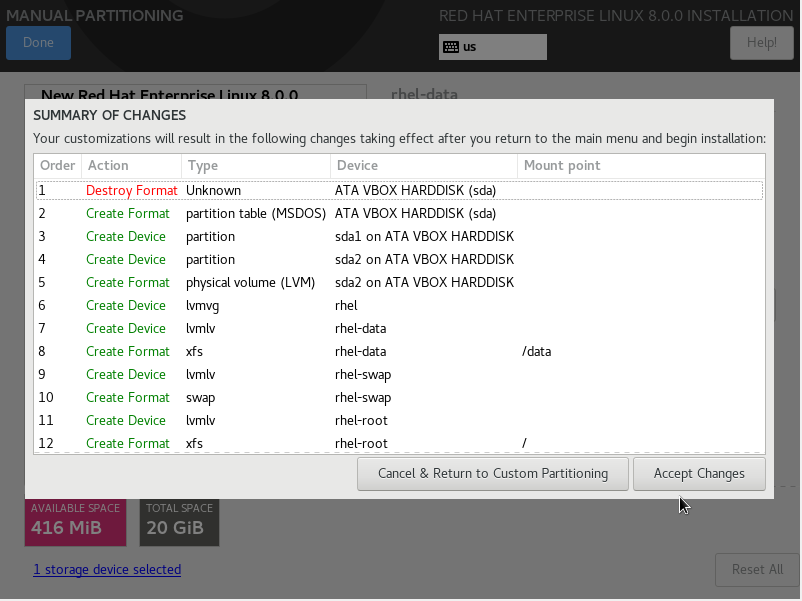
Next screen it will ask for the confirmation to make changes in disk. So, Click on “Accept Changes” to proceed further.
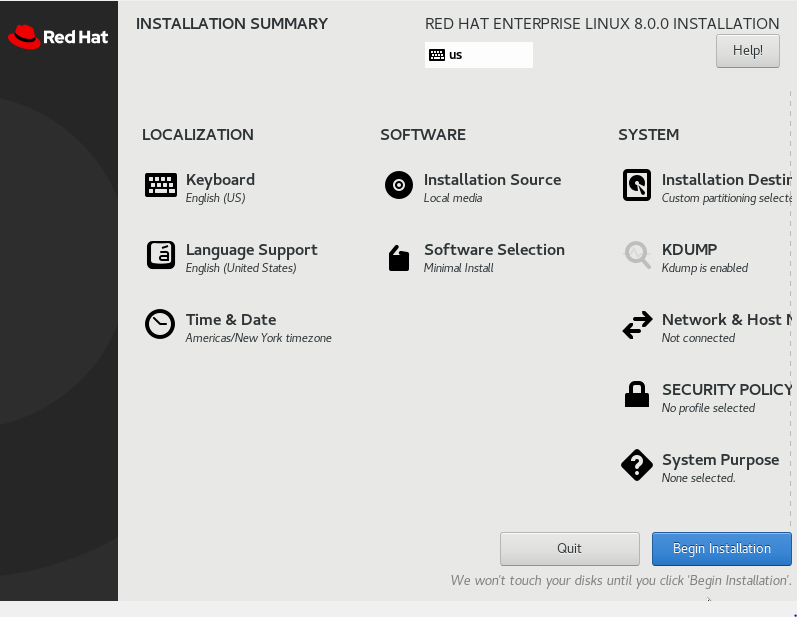
Next you can see a window where you can select the Language, Date and time, Time zone, network settings, Installation source, Installation Destination and Software selection.
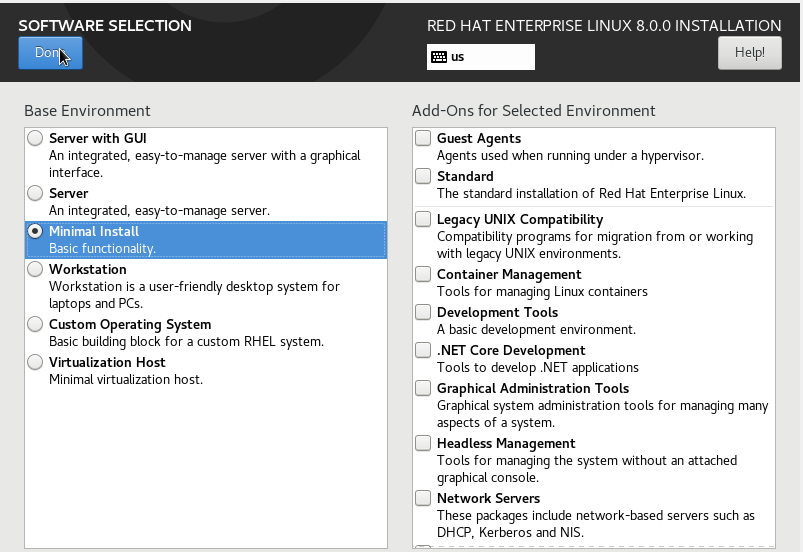
Click on “software selection”
You will find a screen like below. From that you can select the option based on you Configuration, for what you are going to use this server. I used “Minimal Install”. Click on Done from the top left side corner of the screen and again click “Begin Installation”.
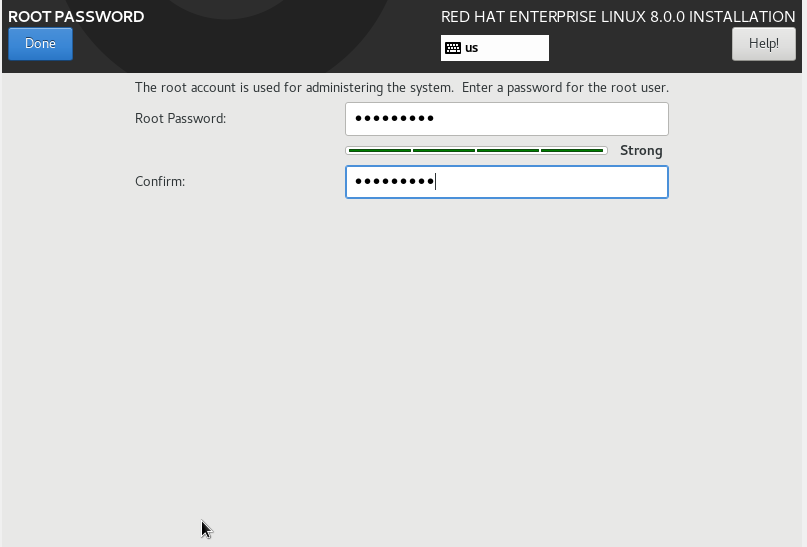
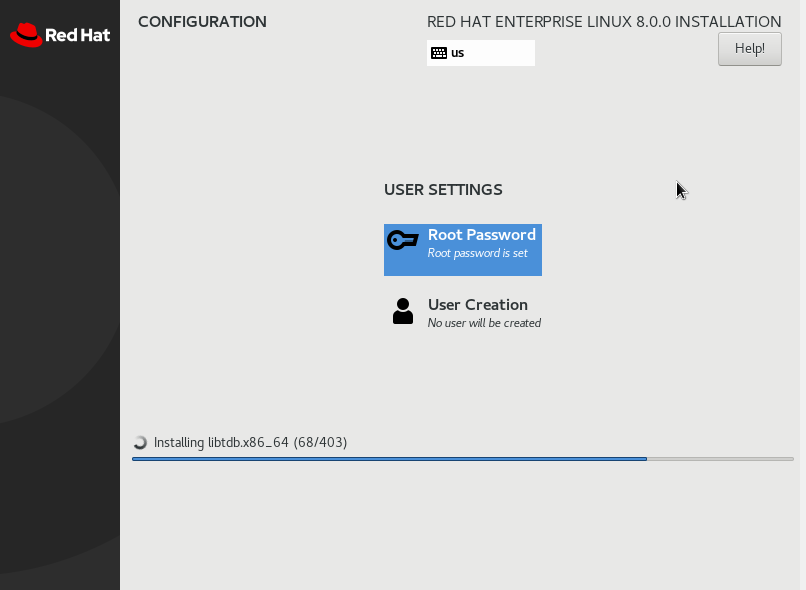
Now it will start the installation and the same time it will show you the option to set password for root user and if you want to create any other user, you can create and click “Done”
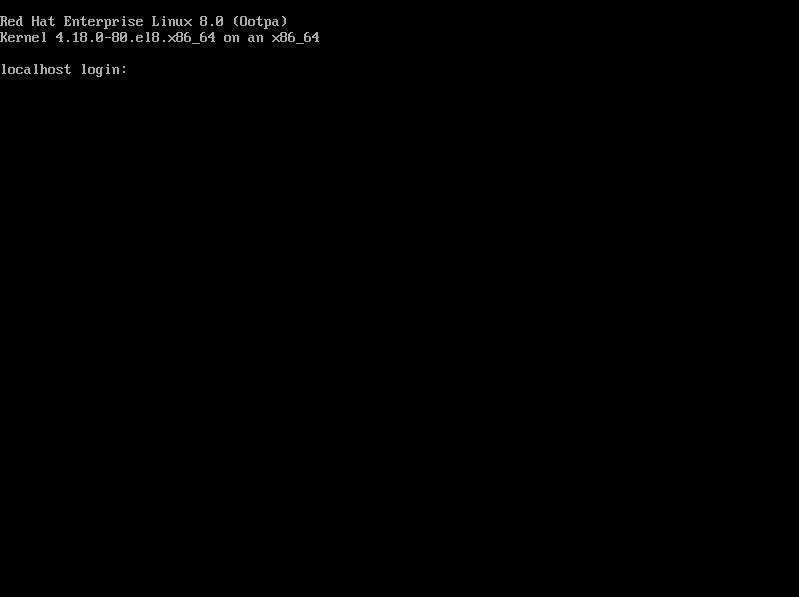
After the Installation click on “Reboot” from the bottom right side corner of the screen and finally system will boot up with new operating system installed and prompt for username and password.
RedHat Enterprise Linux 8 (RHEL 8) released on 7th May 2019 and another important thing is that this happened after acquisition of RedHat by IBM on 28th October 2018.
Release Date:
RHEL 8 released on 7th May 2019 and now its available for production environment.
RHEL 8 Download link:
Architecture:
AMD64, Intel 64-bit, 64-bit ARM, IBM Power Systems, and IBM Z
Overview:
RHEL 8 uses upstream Linux kernel 4.18
This is Secure, Stable and good foundation for hybrid cloud deployments.
New Features:
It Supports 4PB Physical memory
Wayland is default display server, instead of Xorg.
XFS supports shared copy-on-write data extends.
Now cockpit is default package and it comes along with RedHat OS image
RHEL 8 distributed with two main repositories: BaseOS & AppStream
RHEL 8 comes with new version of yum which is based on DNF.
nftables replaces iptables in network framework and we can convert existing iptables rules to nftables format for use.
Nginx 1.14 available in default repository.
Now in RHEL 8 sosreport can report any load of eBPF (extended Berkeley Packet Filtering) programs and maps
Geoliet2 database replaces geolite
In Cluster part we have new pcs commands to list and test available watchdog devices.