Ansible is a free and open-source automation tool and it is available in default package repository/App Stream and no need any special repository to be enabled.
Step 1: Install ansible using dnf command
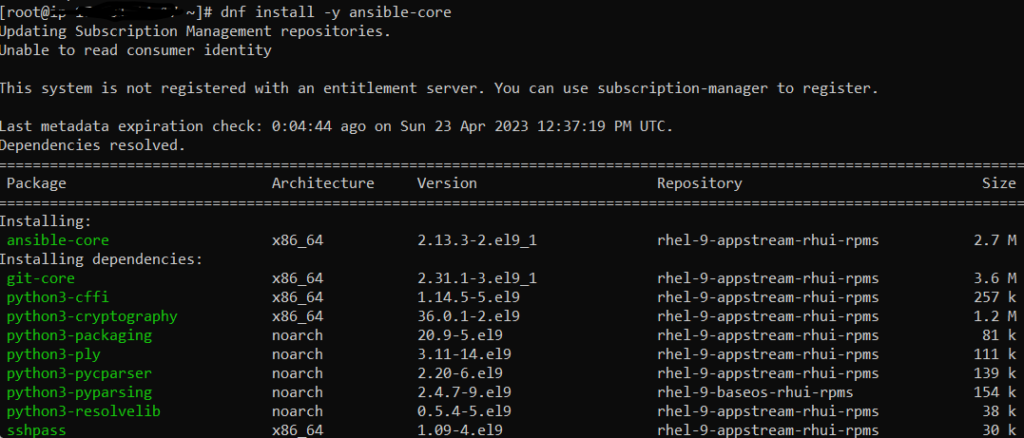
#dnf install -y ansible-core
Once installed, very its version by running below command and we can say this as verifiting whether the ansible or not in our server.
#ansible -version
We can check this by executing something over remote servers using this ansible server. For that, first we need ssh to be enabled between Ansible and remote server. Please use the below link to know how to configure ssh in linux?
I recently came to know that using my account not able to crontab on newly installed machine with RHEL 7.9. Because of this I’m not able to schedule jobs and receiving below error whenever I try to edit the crontab to schedule a job.
[Brines ~]$ crontab -e
You (Brines) are not allowed to use this program (crontab)
See crontab(1) for more information
Which means we have not configured the crontab after the OS installation. Basically, Crontab will check for below two files when you are trying to schedule a job using cron. /etc/cron.allow /etc/cron.deny
First system will check for cron.allow, if the it is not available/not configured then, it will check for cron.deny neither file exist/not configured then, system will allow only root user to use cron scheduler to schedule a job.
Finally in order to allow a normal user to use crontab, We have to add the username in /etc/cron.allow file and then we are free to use the scheduler. below is the example:
#vi /etc/cron.allow lbcuser < newly added user :wq
RedHat Enterprise Linux 8 (RHEL 8) released on 7th May 2019 and another important thing is that this happened after acquisition of RedHat by IBM on 28th October 2018.
Release Date:
RHEL 8 released on 7th May 2019 and now its available for production environment.
RHEL 8 Download link:
Architecture:
AMD64, Intel 64-bit, 64-bit ARM, IBM Power Systems, and IBM Z
Overview:
RHEL 8 uses upstream Linux kernel 4.18
This is Secure, Stable and good foundation for hybrid cloud deployments.
New Features:
It Supports 4PB Physical memory
Wayland is default display server, instead of Xorg.
XFS supports shared copy-on-write data extends.
Now cockpit is default package and it comes along with RedHat OS image
RHEL 8 distributed with two main repositories: BaseOS & AppStream
RHEL 8 comes with new version of yum which is based on DNF.
nftables replaces iptables in network framework and we can convert existing iptables rules to nftables format for use.
Nginx 1.14 available in default repository.
Now in RHEL 8 sosreport can report any load of eBPF (extended Berkeley Packet Filtering) programs and maps
Geoliet2 database replaces geolite
In Cluster part we have new pcs commands to list and test available watchdog devices.
This post will guide you to know How to Register and Enable RedHat Subscriptions, Repositories for RHEL7 before system full upgrade or to install any packages from EPEL Repository in RedHat.
Enabling RedHat repositories are mandatory to install any packages using yum. RedHat subscription has the registered system details once the registration has been done.
Requierment:
All we need is newly installed system with RedHat 7.
Registering and Activating RedHat Subscrition:
As a first step we should go to the RedHat Customer portal and register there. After the successful registration do remember the credentials.
Now login to the RHEL7 server and use the below command to register your system to RedHat Customer portal with RedHat credentials which you created just before
Once register your system, use the “list” option to get the all available subscription and than note down the subscription pool id which you need to activate it.
#subscription-manager list -available
if your not getting any list, than your system registration with RedHat customer portal is not purchased for subscription. Please get in touch with RedHat to proceed further.
Once you got the list of available subscription, you can use the below command to activate the subscription
#subscription-manager subscribe --pool=Pool ID number
To know the status of consumed subscription use the below command
#subscription-manager list –consumed
To list the available subscription use the below command
#subscription-manager list
Once your system registered with RedHat customer portal and activated subscription, you can enable the repositories . Use the below command to list the repositories for you subscription.
#subscription-manager repos --list
use the below command to list the available repository
#yum repolist all
To enable a specific repository, open “vi /etc/yum.repos.d/redhat.repo” file and ensure that “enbaled=1” for concern repository which you want to enable
Now list only enabled repository by executing below command
#yum repolist
Now you can use required yum commands to update your system/ install any packages like below
As we have installed httpd and this will be useful when we access the Nagios core to manage through web console.
[root@nagiosrv yumrepo]# systemctl start httpd
Now create Nagios user account using below command:
[root@nagiosrv yumrepo]# useradd Nagios
[root@nagiosrv yumrepo]# passwd nagios
Changing password for user nagios.
New password:
BAD PASSWORD: The password contains the user name in some form
Retype new password:
passwd: all authentication tokens updated successfully.
Now we need to create a group “nagcmd” to setup Nagios and then add the users “nagios” & “apache” to be a part of group: nagcmd
[root@nagiosrv yumrepo]# groupadd nagcmd
[root@nagiosrv yumrepo]# usermod -a -G nagcmd nagios
[root@nagiosrv yumrepo]# usermod -a -G nagcmd apache
Ñow its time to start Nagios Core server installation
Since Nagios third party tool, we need to download first for installation using below commands:
[root@nagiosrv ~]# cd /opt
[root@nagiosrv opt]# wget https://assets.nagios.com/downloads/nagioscore/releases/nagios-4.4.3.tar.gz
[root@nagiosrv opt]# tar -xvf nagios-4.4.3.tar.gz
[root@nagiosrv nagios-4.4.3]# ./configure --with-command-group=nagcmd
[root@nagiosrv nagios-4.4.3]# make all
[root@nagiosrv nagios-4.4.3]# make install
[root@nagiosrv nagios-4.4.3]# make install-init
[root@nagiosrv nagios-4.4.3]# make install-daemoninit
[root@nagiosrv nagios-4.4.3]# make install-commandmode
[root@nagiosrv nagios-4.4.3]# make install-config
[root@nagiosrv nagios-4.4.3]# make install-exfoliation
Now configure Apache for Nagios installation using below command:
[root@nagiosrv nagios-4.4.3]# make install-webconf
Will configure Apache authentication for nagiosadmin which is default user. Don’t change this username. If you are changing then need to do more changes in configuration file.
Execute below command to make affect in firewall changes which we did using our previous command
[root@nagiosrv ~]# firewall-cmd –reload
Finally we have done everything and now will check whether the web console working on not
Enter url like below in your web browser and replace the IP_ADDR with your server ip
http://IP_ADDR/nagios
It will ask for the username and password. Remember that we already created a user name “nagiosadmin”. We can use that to login the console.
Enter the nagiosadmin credentials and the web console looks like below
From the left side pan click on “Hosts” and it will show list of hosts which is added for monitoring. Since, we doesn’t added any host, it will show only localhost, which is Nagios server like below
Finally we installed and configured Nagios server. Thanks for readin
In this post we are going to see what is split brain syndrome in clusters?
Split brain syndrome is a state on a cluster where each cluster nodes are divided into small clusters and each one will believe themselves as itself only an active cluster.
Each nodes believes that all other nodes are dead and simultaneously will try to access the same data/ disks, which can be lead to data corruption. This situation will occur during the cluster reformation.
When one or more nodes fails, the cluster itself will reform the cluster with the available nodes.
Note: High Availability clusters will use some mechanism like CMAN, Pacemaker, HP ServiceGaurd, and Linux HA to avoid split brain syndrome.
NR: Using NR built-in option, we can print the specific fields along with line numbers and can print all content of a file along with the line numbers. Also, we can print the range of lines using NR in awk command.
Examples:
1. Displaying specific row with a specific field in a file
Using NFS server will share the files/ Directories over the network.
Using this service will install operating system and access the remote server directory/file to read/write files and will share the file/directory to other machines.
/etc/exports : This file contains which all are exported to remotemachines /etc/host.allow : Daemon/ Client which matches the entry available in this file, will be granted access. /etc/host.deny : Access is denied for daemon/ client which matches in this file. /etc/fstab : Will mount the shared directories/ filesystems permanently using this file. /etc/sysconfig/nfs: Will manage the nfs port using this file.
unmount the directory because we mounted temporarily before restart and after restart issue mount to check whether the shared directory is listing or not. If its not listing then there is an issue with entry in /etc/fstab file.
#umount /nfsmount
Restart the client and check using mount command
[root@node1 ~]# mount | grep /nfsmount192.168.43.226:/nfshare/ on /nfsmount type nfs (rw,sync,vers=4,addr=192.168.43.226,clientaddr=192.168.43.67)
We should pay attention to listening ports, to validate and disable the unused ports in infra is a very important thing. In that the way, we can secure the server from the attack surface. So, Will see How to check listening ports in Linux
Known Ports: 993 – IMAPS
1194 – openVPN
1812 – RADIUS
995 – POP3s
2049 – NFS (nfsd, rpc.nfsd, rpc, portmap)
2401 – CVS server
3306 – MySql
3690 – SVN
6000-6063- X11
123 – NTP (Network time protocol used for time syncing uses UDP protocol)
137 – NetBIOS (nmbd)
139 – SMB-Samba (smbd)
143 – IMAP
161 – SNMP (For network monitoring)
389 – LDAP (For centralized administration)
443 – HTTPS (HTTP+SSL for secure web access)
514 – Syslogd (udp port)
636 – ldaps (both ctp and udp)
873 – rsync
989 – FTPS-data
990 – FTPS
20 – FTP Data (For transferring FTP data)
21 – FTP Control (For starting FTP connection)
22 – SSH (For secure remote administration which uses SSL to encrypt the transmission)
23 – Telnet (For insecure remote administration)
25 – SMTP (Mail Transfer Agent for e-mail server such as SEND mail)
53 – DNS (Special service which uses both TCP and UDP)
67 – Bootp
68 – DHCP
69 – TFTP (Trivial file transfer protocol uses udp protocol for connection less transmission of data)
80 – HTTP/WWW(Apache)
88 – Kerberos
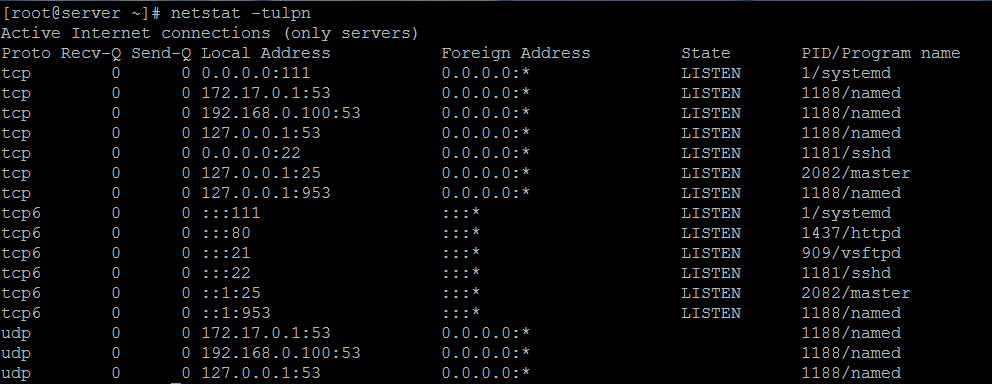
110 – POP3 (Mail delivery Agent) Issue the below command as root user to check the listening ports.
Will use netstat command to check open ports.
#netstat -tulpn t - Will enables listing of tcp ports. u - Will enables listing of udp ports n - this will shows the port numbers l - It will list only listening pockets
/etc/services - by reading this file we can read different types port/protocol combinations and applications.
#less /etc/services
lsof command: Package for lsof: lsof-4.87-4.el7.x86_64
To check the package avilability in linux use the below command.
#rpm -qa | grep -i lsof
To list open ports:
#lsof -i
To display all open files:
nmap command: Using nmap command will check the open ports for remote server.
Using below command will check open ports in local machine. #nmap -sT -O localhost